This is a support page for day 7 of an 8-session class is a basic introduction to both electronics and programming the Arduino microprocessor. The intent is to prepare the student for what is currently popular in the maker world, rather than an electronics or engineering degree, and includes some things of interest to amateur radio enthusiasts.
Day 1, Day 2, Day 3, Day 4, Day 5, Day 6, Day 7, Day 8
Day 7: Code libraries, NeoPixels, displaying text
Goals:
-
- Include external libraries in a sketch
- Explain what a code library is
- Understand how NeoPixel displays work
- Present information on a B&W display
- Know about other Arduino and similar development boards
Vocabulary:
-
- Code library
- NeoPixel display
- NeoPixel array
- NeoPixel ring
- OLED display
- LCD Screen
Projects (below):
NeoPixel – schematic diagram, wiring and code
Schematic:
![]()
Build:
![]()
Code:
NeoPixel.ino
Copied!
#include <Adafruit_NeoPixel.h>  // see https://learn.adafruit.com/adafruit-neopixel-uberguide/arduino-library-use

#define PIN 4
#define NumOfLEDs 1

// Parameter 3 = pixel type flags, add together as needed:
Adafruit_NeoPixel strip = Adafruit_NeoPixel(NumOfLEDs, PIN, NEO_GRB + NEO_KHZ800);

//   strip.setPixelColor(pixelNum, strip.Color(redNum, greenNum , blueNum)); // sets an individual light
//   strip.show(); // This sends the updated pixel color to the hardware.

void setup() {
  strip.begin();
  strip.show(); // Initialize all pixels to 'off'
}

void loop() {
  // Example procedures of different ways to display the NeoPixel.  Uncomment to try them:
  strip.setPixelColor(0, 255, 0, 0); // first pixel, red only & full intensity
  strip.show();  // engages prior settings
  delay(2000);

  // colorWipe(strip.Color(204, 0, 204), 90); // Pink
  // delay(2000);
  // colorWipe(strip.Color(255, 0, 0), 590); // Red
  // delay(2000);
  // colorWipe(strip.Color(0, 255, 0), 1590); // Green
  // delay(2000);
  // colorWipe(strip.Color(0, 0, 255), 3590); // Blue
  // delay(2000);
  // colorWipe(strip.Color(15, 205, 204), 3590); // Turquiose
  // delay(2000);
  // colorWipe(strip.Color(90, 25, 190), 90); // Purple
  // delay(2000);

  // Send a theater pixel chase in...
  // theaterChase(strip.Color(127, 127, 127), 60); // White
  // theaterChase(strip.Color(127,   0,   0), 60); // Red
  // theaterChase(strip.Color(  0,   0, 127), 60); // Blue

  // rainbow(20);
  // rainbowCycle(20);
  // theaterChaseRainbow(90);

} // +++++ end of main loop


// ------- NeoPixel functions: --------------
// Fill the dots one after the other with a color
void colorWipe(uint32_t c, uint8_t wait) {
  for(uint16_t i=0; i < strip.numPixels(); i++ ) {
      strip.setPixelColor(i, c);
      strip.show();
      delay(wait);
  }
}

void rainbow(uint8_t wait) {
  uint16_t i, j;

  for(j=0; j<256; j++) {
    for(i=0; i < strip.numPixels(); i++) {
      strip.setPixelColor(i, Wheel((i+j) & 255));
    }
    strip.show();
    delay(wait);
  }
}

// Slightly different, this makes the rainbow equally distributed throughout
void rainbowCycle(uint8_t wait) {
  uint8_t i, j;

  for(j=0; j<256*5; j++ ) { // 5 cycles of all colors on wheel
    for(i=0; i < strip.numPixels(); i++) {
      strip.setPixelColor(i, Wheel(((i * 256 / strip.numPixels()) + j) & 255));
    }
    strip.show();
    delay(wait);
  }
}

//Theatre-style crawling lights.
void theaterChase(uint32_t c, uint8_t wait) {
  for (int j=0; j < 10; j++) {  //do 10 cycles of chasing
    for (int q=0; q < 3; q++) {
      for (int i=0; i < strip.numPixels(); i=i+3) {
        strip.setPixelColor(i+q, c);    //turn every third pixel on
      }
      strip.show();

      delay(wait);

      for (int i=0; i < strip.numPixels(); i=i+3) {
        strip.setPixelColor(i+q, 0);        //turn every third pixel off
      }
    }
  }
}

//Theatre-style crawling lights with rainbow effect
void theaterChaseRainbow(uint8_t wait) {
  for (int j=0; j < 256; j++) {     // cycle all 256 colors in the wheel
    for (int q=0; q < 3; q++) {
        for (int i=0; i < strip.numPixels(); i=i+3) {
          strip.setPixelColor(i+q, Wheel( (i+j) % 255));    //turn every third pixel on
        }
        strip.show();

        delay(wait);

        for (int i=0; i < strip.numPixels(); i=i+3) {
          strip.setPixelColor(i+q, 0);        //turn every third pixel off
        }
    }
  }
}

// Input a value 0 to 255 to get a color value.
// The colours are a transition r - g - b - back to r.
uint32_t Wheel(byte WheelPos) {
  if(WheelPos < 85) {
   return strip.Color(WheelPos * 3, 255 - WheelPos * 3, 0);
  } else if(WheelPos < 170) {
   WheelPos -= 85;
   return strip.Color(255 - WheelPos * 3, 0, WheelPos * 3);
  } else {
   WheelPos -= 170;
   return strip.Color(0, WheelPos * 3, 255 - WheelPos * 3);
  }
}
To help with color selection, go to HTML Color Picker
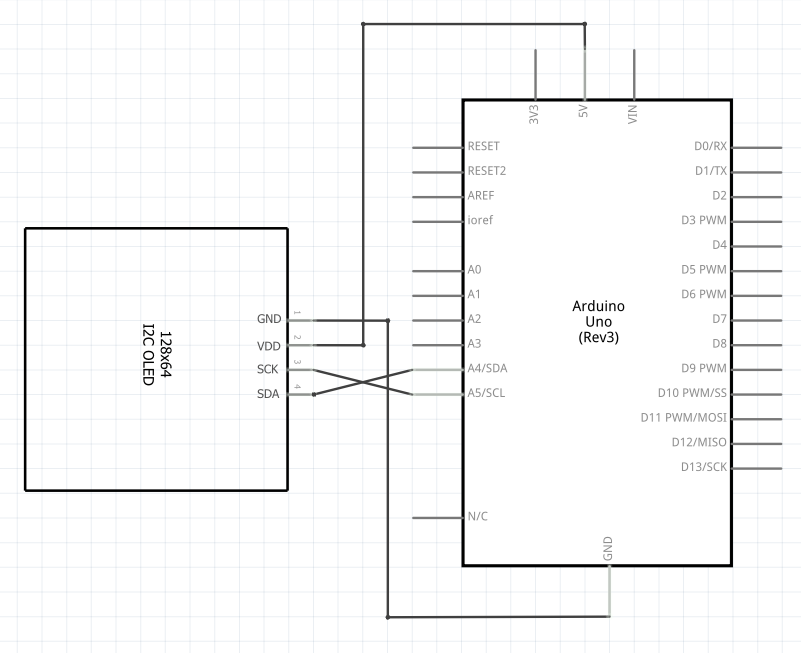
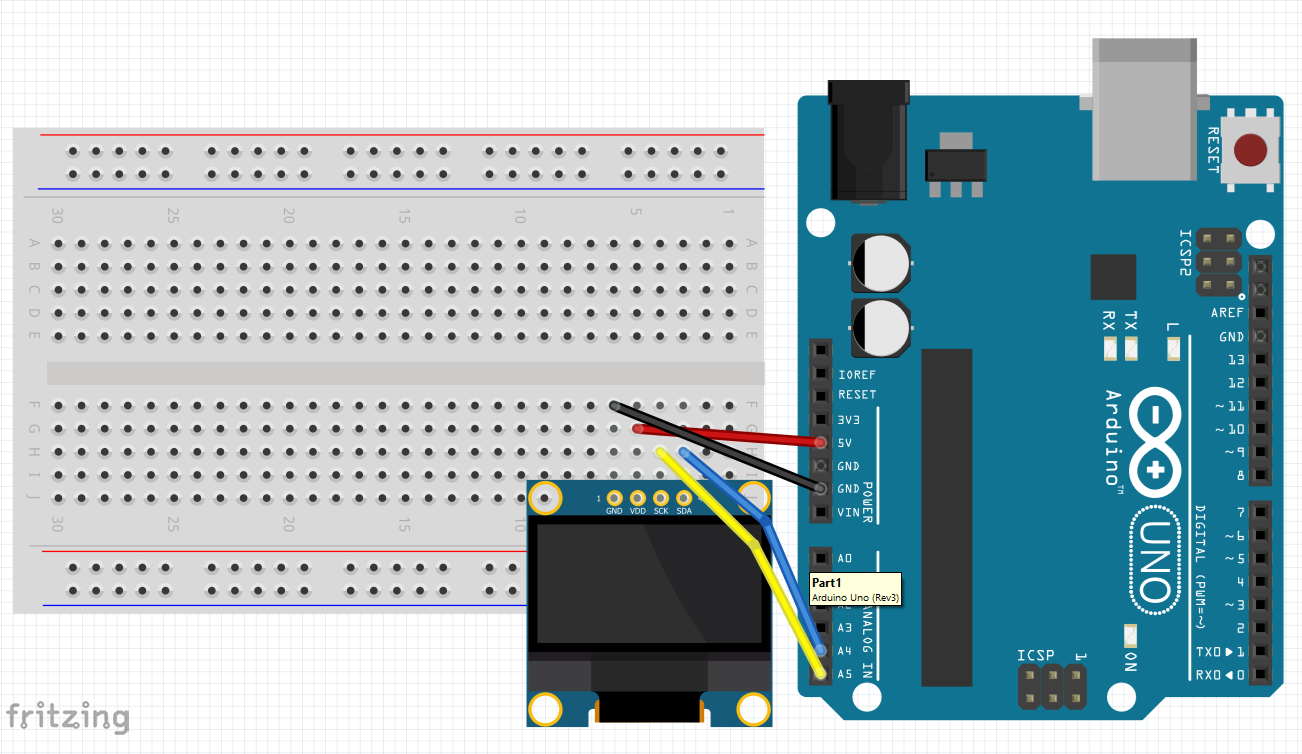
OLED Display – schematic diagram, wiring and code
Schematic:
Build:
Code:
OLED.ino
Copied!
/*
 * Created by ArduinoGetStarted.com
 *
 * This example code is in the public domain
 *
 * Tutorial page: https://arduinogetstarted.com/tutorials/arduino-oled
 */

#include <Wire.h>
#include <Adafruit_GFX.h>
#include <Adafruit_SSD1306.h>

#define SCREEN_WIDTH 128 // OLED display width,  in pixels
#define SCREEN_HEIGHT 64 // OLED display height, in pixels

// declare an SSD1306 display object connected to I2C
Adafruit_SSD1306 oled(SCREEN_WIDTH, SCREEN_HEIGHT, &Wire, -1);

void setup() {
  Serial.begin(9600);

  // initialize OLED display with address 0x3C for 128x64
  if (!oled.begin(SSD1306_SWITCHCAPVCC, 0x3C)) {
    Serial.println(F("SSD1306 allocation failed"));
    while (true);
  }

  delay(2000);         // wait for initializing
  oled.clearDisplay(); // clear display

  oled.setTextSize(1);          // text size
  oled.setTextColor(WHITE);     // text color
  oled.setCursor(0, 10);        // position to display
  oled.println("Hello World!"); // text to display

  // oled.setTextColor(SSD1306_BLACK, SSD1306_WHITE); // Draw 'inverse' text
  // oled.setCursor(0, 20);        // position to display
  // oled.println(" 'Hello' in black "); // text to display
  // oled.setTextColor(WHITE);     // text color
  // oled.setCursor(0, 30);        // position to display
  // oled.print("Size 1");         // setTextSize already defined above
  // oled.setCursor(0, 40);        // position to display
  // oled.setTextSize(2);          // Draw 2X-scale text
  // oled.print("Size 2");

  // oled.drawLine(0, 60, oled.width()-1, 60, WHITE); // format: (Start)x,y, (End)x,y, color
  // oled.drawRect(75, 5, 10, 10, SSD1306_WHITE);  // format: (Start)x,y, width, height
  // oled.drawCircle(95, 10, 5, SSD1306_WHITE);    // format: (Center)x,y, radius, color
  // oled.fillCircle(110, 10, 5, SSD1306_WHITE);   // format: (Center)x,y, radius, color
  // oled.drawTriangle(120, 5, 120, 15, 128, 15, WHITE);  // format: x1,y1, x2,y2, x3,y3
  // oled.fillRect(80, 35, 55, 20, SSD1306_WHITE); // format: (Start)x,y, width, height
  // oled.fillCircle(105, 44, 5, SSD1306_INVERSE); // format: (Center x,y, radius, color

  oled.display();               // show on OLED

}

void loop() {
}
Homework:
-
- Pick a project and customize it with the OLED display
![]()